FastAPI를 이용해서 Relationship 데이터를 처리하면서 해당 부분만 요약해서 정리해 본다.
본 예시에서는 Post라는 본문에 관련있는 Account들을 나열하는 구조를 예시로 잡았다.
그리고 기본 프로그램의 구조는 아래와 같다.
.
└── crud.py
├── database.py
├── main.py
├── api.py
└── schemas.py
이를 위해 Account와 Post에 대한 관계 테이블에 대한 Model을 정의 해야 한다.
Post와 관련있는 Account를 참조하기 위해서 Account에 post_id라는 외례키 컬럼을 추가하였다.
models.py
from sqlalchemy import Boolean, Column, Integer, String, DateTime, BigInteger, ForeignKey
from database import Base
from sqlalchemy.orm import relationship


class Account(Base):
    __tablename__ = "account"

    id = Column(BigInteger, primary_key=True, index=True, autoincrement=True)
    source = Column(String(500))
    site = Column(String(500))
    country = Column(String(500))
    account_type = Column(String(500))
    post_id = Column(BigInteger, ForeignKey("posts.id"))

    posts = relationship("Post", back_populates="accounts")

class Post(Base):
    __tablename__ = "posts"

    id = Column(BigInteger, primary_key=True, index=True, autoincrement=True)
    title = Column(String(5000))
    content = Column(String(16777215))
    state = Column(String(500))
    writer = Column(String(500))
    owner = Column(String(500))


    accounts = relationship("Account", back_populates="posts")
관계 테이블을 작성할시 sqlalchemy 에서는 relationship을 이용하는데, 이때 상호간 생성한 컬럼을 알 수 있도록 해주어야 한다.
위 테이블 기준으로 아래와 같이 back_populates에 관계되는 컬럼을 적어 주어 서로간에 연결이 되어 있음을 명시해주도록 하자.

이제 스키마(Schema) 를 작성하도록 하자.
스키마는 FastAPI에서 기본이되는 모델을 BaseModel로 지정하고 호출할때 이용하는 API 기준으로 나누어 작성하면 효율적으로 사용할 수 있다. Post관련 BaseModel과 Post를 단건 호출할 때 사용하는 Id를 구분하여 아래와 같이 작성하였다.
schemas.py
from typing import List, Optional
from datetime import date
from pydantic import BaseModel


class AccountBase(BaseModel):
    source: Optional[str]  = None
    site: Optional[str]  = None
    country: Optional[str]  = None
    account_type: Optional[str]  = None


class AccountCreate(AccountBase):
    pass

class Account(AccountBase):
    id: int
    post_id: int

    class Config:
        orm_mode = True


class PostBase(BaseModel):
    title: Optional[str]  = None
    content: Optional[str]  = None
    state: Optional[str]  = None
    writer: Optional[str]  = None
    owner: Optional[str]  = None

class PostCreate(PostBase):
    pass

class Post(PostBase):
    id: int
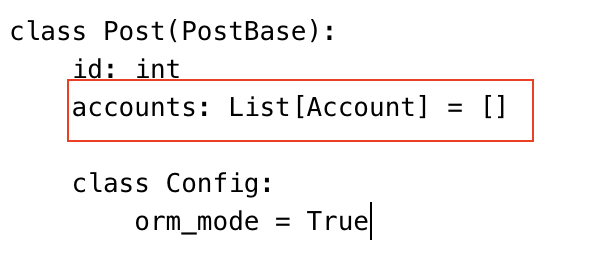
    accounts: List[Account] = []

    class Config:
        orm_mode = True
위에서 주의할 부분은 Post를 가져올 때 관계되는 Account를 가져오기 위해서 Account 클래스를 List로 지정한다는 것이다.
그리고 accounts 라는 이름은 앞서 models에서 지정한 relationship 이름과 동일해야 한다.

이렇게 관계 데이터를 만들었다면, api 호출 부분과 crud.py와 같은 부가적인 파일들에 대해 간단히 작업을 해주면 아래와 같이 id 기준으로 호출 하는 API를 작성해 주면 작업이 마무리 된다.
api.py
from sqlalchemy.orm import Session
from fastapi import Depends, FastAPI, HTTPException
from fastapi.middleware.cors import CORSMiddleware
import schemas, crud
from database import db

@app.get("/posts/{post_id}", response_model=schemas.Post)
def read_post(post_id: int, dbsession: Session = Depends(db.session)):
    db_post = crud.get_post(dbsession, post_id=post_id)

    if db_post is None:
        raise HTTPException(status_code=404, detail="Post not found")

    return db_post
crud.py
from sqlalchemy.orm import Session
import models, schemas


def get_post(db: Session, post_id: int):
    return db.query(models.Post).filter(models.Post.id == post_id).first()
database.py
import sqlalchemy as db

engine = db.create_engine('mysql+pymysql://test:test123!!@db.database.com/db_name')
main.py
import uvicorn


if __name__ == '__main__':
    try:
        uvicorn.run(
            "api:app"
        )
    except KeyboardInterrupt:
        print('\nExiting\n')
    except Exception as errormain:
        print(str(errormain))
이후 해당 main.py를 실행하고 http://localhost:8080/docs 를 웹 브라우저로 접근하면, 앞서 만든 Get posts를 진행하면 아래와 같이 관계된 account의 정보도 함께 가져오게 된다.

'Python' 카테고리의 다른 글
| Python - JSON 데이터 검색 및 불러오기(dumps, loads, items) (0) | 2024.03.25 |
|---|---|
| Python - FastAPI with CRUD application by pydantic (0) | 2024.03.25 |
| PYTHON - pip 패키지 실치 [SSL: CERTIFICATE_VERIFY_FAILED] 오류 해결 (0) | 2024.03.18 |
| Python - Microsoft 365 Defender Advanced hunting Query (0) | 2024.03.18 |
| Python - Base64 인코딩, 디코딩 방법(인증/로그인/토큰) (0) | 2024.03.18 |


